
This buying guide helps you choose a cordless drill for the holes you need to make and the screws you need to drive. Start with the material, bit size, and room you have to work. Then compare the weight of the drill with its battery installed, the controls you’ll use repeatedly, and what comes in the box.
How to choose a cordless drill for your projects
A drill/driver with a three-jaw chuck handles ordinary drilling and screwdriving. An adjustable clutch helps limit driving torque so you can seat a screw without burying the head. A hammer drill/driver adds a percussion mode for suitable masonry bits and occasional holes in brick or concrete, within the tool’s stated capacity. For repeated or larger holes in concrete, check whether the job calls for a rotary hammer. An impact driver is useful for driving long fasteners with compatible bits. For ordinary round-shank drill bits and controlled screw seating, look for a drill/driver.
Check the documentation for the exact kit. A manufacturer drill/driver specification shows how chuck size, gear ranges, and clutch settings are listed. Benzafind’s Drills & Impact Drivers section is a starting point for identifying the tool type you need.
Choose a size that fits the job
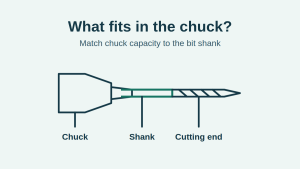
For flat-pack furniture, cabinet hardware, or occasional pilot holes, prioritize a short body, a light battery, and a trigger you can control at low speed. If you regularly drill through framing lumber or use larger bits, start with the manufacturer’s capacity for the material and bit type, then check the supplied handle and the tool’s loaded weight. A larger chuck accepts larger shanks, but chuck size alone tells you little about what the motor and gearbox can handle.
What to look for beyond voltage
| Criterion | Practical benefit | What to verify |
|---|---|---|
| Chuck capacity | Lets your existing bits fit | Check bit shank diameter and the drill’s capacity for the material. |
| Two-speed gearbox and variable trigger | Help you start cleanly and control the tool as the load changes | Check which gear the manual recommends for your drilling and driving tasks. |
| Adjustable clutch | Helps seat screws consistently | Check how easily you can change settings and distinguish screwdriving from drill mode. |
| Size and loaded weight | Affect overhead work and access inside cabinets | Include the battery you intend to use when checking weight and overall length. |
| Battery platform and kit | Determine whether you can start work and reuse batteries | Verify the exact battery and charger compatibility and whether either comes with the tool. |
Match the drill and bit to a real job
For a cabinet hinge, a compact drill/driver with a small battery leaves more room to line up the bit. Drill a pilot hole in matching scrap and start with a low clutch setting. Raise it just enough to seat the screw. A clutch limits torque, so the same setting can seat a screw differently in harder wood or a different pilot hole. For a masonry anchor, use the anchor maker’s specified bit type and diameter and check that the drill supports the task. Locate hidden wiring or pipes before drilling into a wall. A larger battery can be useful when you need more time between charges, but it can also make overhead work more tiring.
For a metal bracket, choose a bit intended for that metal and check the drill’s recommended speed for the diameter. Switch percussion off and secure the work so it can’t spin if the bit catches. A lower gear gives you a lower speed range for demanding jobs. The trigger then lets you ease into the cut. A drill/driver instruction manual illustrates how manufacturers distinguish gear selection, clutch mode, and drilling mode. Follow the instructions for the model you buy.
Check what the battery kit includes
If you’re already invested in batteries, verify the exact pack and charger model numbers against the compatibility chart. Similar voltage labels alone cannot establish compatibility. If this is your first cordless tool, compare the total cost of a kit with a charger and the battery size you will actually carry. A second pack helps most when you can charge one while working with the other.
Common buying mistakes
- Choosing by voltage alone and overlooking the chuck, gear ranges, and loaded weight.
- Buying a bare tool before confirming that an existing battery and charger fit the exact platform.
- Using drill mode for delicate screwdriving and bypassing the torque clutch.
- Assuming a wood bit or an ordinary drill/driver will handle every masonry job.
Checklist before you buy
- List the materials, largest bit shank, and longest fasteners you expect to use.
- Check the manufacturer’s drilling capacity for each material.
- Confirm that the tool fits the tightest space you need to reach.
- Verify battery and charger compatibility and all kit contents.
- Budget for bits, a compatible spare battery if needed, and eye protection.